
Soda ash... the saddest thing to see on a decorative soap top.
I've read several different methods soapers use try to prevent soda ash and then try to remove it if those fail. If you Google 'soda ash' you will find TONS of info from more experienced soapers than myself. The following is what I tested personally!
Prevention tricks I have tried:
-spraying soap with 91% isopropyl alcohol
-covering soap with plastic wrap
-soaping between 80°F-120°F
-soaping between 80°F-120°F
Removal tricks I have tried:
-rinsing ash away with distilled water
-gently scrubbing it away with a nylon and distilled water
-steaming it away
-planing it off
-planing it off
I often forget to cover my soap or to spray it with rubbing alcohol but I do think the covering helps. Unless... you get ash during the cure. I usually get the most ash over time as the soap cures and not right away.
This is the first batch I experienced soda ash with, It's the Herbivore, 100% palm oil. This got ash only on some of the top and it showed up during cure. It was a relatively flat top so I planed most of it off before giving it away and kept the one with the worst ash to play with. Unfortunately I don't have a before picture, but you can see that a conservative steam did not remove all the ash.

Here is a case where I thought it better to just plane the ash off. This developed ash all over after being removed from the mold but before cutting. I did try a light wash/rinse with distilled water, but I didn't like the 'used' look it gave the bars.

The planer takes off a very thin layer of soap.

Looking brighter and clearer now!

Next is the pretty citrus column swirl I did with neons and Bramble Berry's Sweet Meyer Lemon. Looking a little dull and ashy though... This one developed ash during the cure. It has ridges on the top from the column swirl (couldn't tap the mold down enough to smooth them without getting that flip up lip) so it's not a candidate for planing. Not having much luck with the rinse and having medium luck with steaming, I went for that.

I steamed it more aggressively but was still leery of melting or scorching the soap! I did it from the distance you see here and waited for the bars to air dry before steaming them again. The steamer I use is a clothes steamer that retails at $25. So not just big batch soapers can steam!

They get quite wet and shiny! I steamed them three times...

But they still had visible signs of soda ash. I became less enchanted with steaming after this.

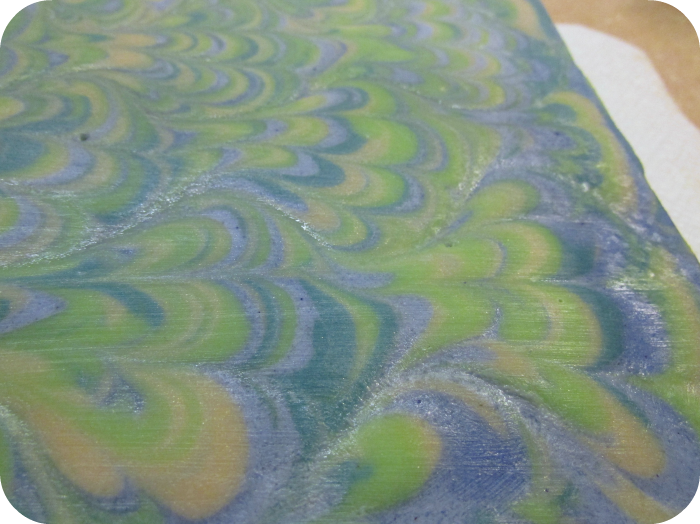
Then this pretty pet came down with an ashy top too! *Gasp* Noooooooo! This developed ash before the cure, after I removed it from the refrigerator. I was especially sad about this because this batch was all top and I was really proud I had made this peacock swirl work! Determined to fix it I tried a scrubby method.

I read on the SoapQueen Blog a great article about ash and how to remove it. I tried technique #2 here. I used an old nylon stocking and some distilled water to gently scrub away the ash.

While I do love the SoapQueen and I have learned so much from Anne-Marie's blog, I didn't find this method to be a winner for this soap. I'm guessing this is a better method after cure when the soap is much harder. It worked a little but the soap still looked dull.
Even though the nylons were finely knitted (sad day, they were a super sexy pair from Nordstrom with a back seam that got ONE wear) it still left some physical marks that I didn't care for. I'm thinking it's because the soap was too new and soft.
I was desperate to take pretty pictures of this soap cut to finish the blog post about it. I didn't want to post ashy pictures, it just looked so dull and lifeless compared to when it was just poured.
So I hit it hard. I lined them up on a piece of cardboard and steamed the heck out of them. I steamed at close range and lingered on spots. The darkest blue showed the ash the most so I went back over those spots a few times. I read here how Kenna from Amathia Soapworks dipped her bars and used a heat gun after to gently dry them. So even though I just steamed them, I got my hair drier and blasted them (this time from a reasonable distance) on warm. It blew the excess water off the bars and helped speed up the drying. They were still tacky and too wet to handle so I let them air dry the rest of the day. But not before misting them with 91% isopropyl rubbing alcohol. Why? Beats me. Really I was just scrambling to think of anything I had ever read that prevented or removed soda ash.
Lo and behold... shiny vivid bars.

I tried this same method on this soap which developed ash during the cure. It did not work as well though. The above process was performed on very new and uncured soap successfully (which has not developed further ash while curing). The Twenty & Fifteen soap was almost cured and quite firm when I performed this technique on it.
I still prefer planing above all others. Though I do hate to waste the soap by shaving layers off... sometimes I have to plane off a few layers to get all the ash. But I love the super smooth shiny look to the bars. Wavelength soap just out of the mold:

After cutting and planing. The colors are crisp and vivid and the bars have nice sharp edges.
Here is the Bubble Sherbet cut and after one steam. It developed ash immediately so I steamed it pretty early on. I wanted to use that method while it still worked.

The second time I steamed it I added a little bit of 91% isopropyl alcohol to the distilled water I used in the steamer. Then dried them with a hair drier on warm afterwards. This worked very well. Here is a steamed and un-steamed for comparison:

In conclusion I think the method you use should be determined by the age of the soap. New soap- steam it. Older soap- dip and lightly scrub. The method used must also take into account the texture of the ashy surface. Flat- skip everything and just plane the offending layers off after cure. Raised and bumpy- dip or steam.
No comments :
Post a Comment